Below are some progress pictures of Carbon Fiber wing end
plates, soon to be on sale. I have decided to leave a little something for
the modeler to do. Which is to drill the holes and put the final touches to
them. Each will come with a template, with all the positions marked for
the holes also indicating the size to be drilled.
The resins used in making the Carbon fiber laminates are very
hard and will dull your tools very quickly. Do not use excessive force
when drilling holes or you will break your drill bits very quickly.
I have been using different drill bits, and I have found that
the regular drill bit in a drill press will last long enough to drill all the
holes. But do not use excessive force, and only have approx. 1/8" of the drill
bit protruding from the chuck. The dust created is carbon and is very messy,
just like the graphite of a pencil. So don't wipe your hands on your shirt or
face. :)
The Brazil GP set will be more expensive as I have to produce all the wing
elements as well, because none of the kit rear wing parts will get used.
|
|
|
|

|
|
|
|
MP4/6 Rear wing end plate, Brazil version |
|
The picture is not very good and there is a lot of carbon dust around the tape. But this is roughly how the End plates will arrive. Two together with the template attached with tape holding them together. |
|
|
|
|
|
|

|
|
|
|
MP4/6 Rear wing end plate |
|
This picture is a little clearer. The actual templates that come with the end plates will tell you what the hole size is in each place as well. This is just the prototype. |
|
|
|
|
|
|

|
|
|
|
MP4/6 Carbon Fiber rear wing end plate, Brazil GP |
|
It is hard to see the holes in this picture, but they are there. At this stage I decided to use 0.021" dia drill, so that when the rear wing is assembled with the new elements, small bolt/cap head screws will fit, for super detail. But at least you can see the size of the fiber mat. |
|
|
|
|
|
|
|

|
|
|
|
MP4/6 Carbon Fiber rear wing end plate |
|
The holes assist in assembling the complete rear wing by using 0.020" brass rod, which will thread thru the elements completely. Once everything is glued in place the rod can be removed and the cap nuts inserted. |
|
|
|
|
|
|

|
|
|
|
Carbon End plates. |
|
This is the two wings with some spacers, which are about 1" shorter than the wing will be when completed. I put it together quickly just fro the picture. |
|
|
|
|
|
|

|
|
|
|
Left Side outer wing plate. |
|
The wing is upside down, but you can see the holes, which will be used to hold the wing elements in possition. |
|
|
|
|
|
|
|
|
|

|
|
|
|
Left side inside view. |
|
If you look carefully the is a fine line across the wing at the bottom of the photograph. This is where the wing fractured while I was sanding the edge. I have to be more careful about the presure used. |
|
|
|
|
|
|
|

|
|
|
|
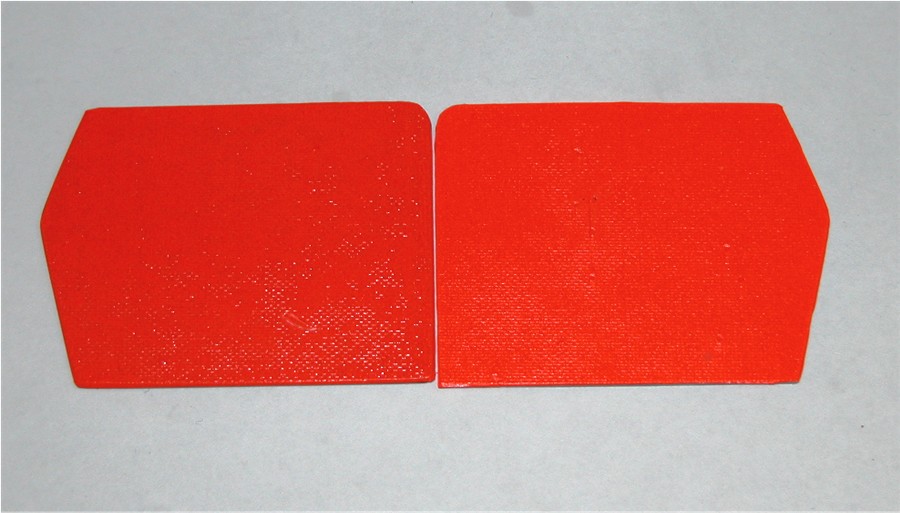
Left Outside. |
|
I have applied some "Modeler's" Fluorescent red decal directly to the Carbon fiber using Micro Sol. It may have a better look by applying a thin coat of white paint first to make the decal brighter and match the body better. |
|
|
|
|
|
|

|
|
|
|
Left Outside. |
|
Hard to see, but this is after the hair drier has played over the surface. |
|
|
|
|
|
|

|
|
|
|
Right Inside. |
|
For the inside I decided just to apply "Future" directly to the Carbon Fiber. |
|
|
|
|
|
|
|

|
|
|
|
Left Outside. |
|
I brushed on a second coat of Micro Sol, and let it sit for 5 minutes then put it under the hair drier again. This is the result. |
|
|
|
|
|
|

|
|
|
|
Left Outside. |
|
As the decal is not glossy, I decided to use "Future". The first coat is soaked up by the decal. It will obviously need more coats and a little sanding and polishing. The end result will still show the Carbon patern through the color. |
|
|
|
|
|
|

|
|
|
|
Inside right. |
|
This is after 3 coats of "Future". It's going to need more. |
|
|
|
|
|
|
|
|
|
|
|
|
|
Today I applied a thin coat of white paint before the decal. It is very hard to see in the picture, but the difference is Night and Day. Whatever you do, apply a base coat of white. |
|
|
|
|
|
|
|